Welcome to my blog. First, a thank you to Carla, for hosting another fun blog hop! I always enjoy these blog hops, looking at all the creativeness out there.
My long time readers know how much I love to give my stitching goodies. I am always making things for birthdays and Christmas. I have 4 kids, so have made many a quilt for them. Along with book bags and pencils pouches, purses and pillow cases. Making things is FUN! And giving them is even better! Extended family members and friends have all been recipients of my quilts and things.
My latest quilt is this one. As you can see, it isn't finished yet. But I promised you a full picture today, so here it is. I hope to finish it soon.

This is my Cornerstones on Edge pattern. I took my original Cornerstones pattern, made the blocks 3" bigger and put them on point. I really love this design! A perfect one for boys (I have 3 boys, so am always trying to find good patterns for them). Of course, it's great for girls too ;)
Here's a closeup. I am doing 'organic' straight line quilting, simple and easy.

Carson is 15, he is already 5' 10". He outgrew his dinosaur quilt long ago and is really in need a of new quilt. He is my picky teenager, so I let him choose the colors for his quilt. I showed him a page full of these beautiful Shadow Play fabrics and told him to pick 3 or 4 colors.....The gray and black were a given. lol. And he loves animals, so I threw those in for a bit of fun :)
~~~~~~~~~~~~~~ Christmas is right around the corner, so I've been busy making a few small gift items too. This little mat/wall hanging is simple and quick to put together, so I thought, as my gift to you, my readers and visitors, that I would give you the pattern so you can make a few too. It is a simple, quick design using mostly 2.5" squares and HTS's. You can use any size squares you want and make it any size. Or make a few and put them into a table runner, or make a lot and make it into a quilt. You can put hanging triangles in the back and make it a wall hanging. I think it would look lovely with a big candle in the center of it, used as a candle mat.

Here you go:
This project is 18.5" square. It's made up of 2.5" squares and some 2.5" HST's.
You will need: twenty-eight - 2.5" colored squares, any color you want.
four - 2.5" background squares
eight - 3" colored squares
four - 3" background squares
one 6.5" background square
two - 2.5" x 14.5" background strips
two - 2.5" x 18.5" background strips
 |
| I forgot to put the 6.5" square and four of the 3.5" squares in the picture |
Make eight HST's from four of the 3" colored squares and the 3" background squares. Using whichever method you like. Trim to 2.5". Press seam towards background square.

Lay out 4 sets of 6 colored squares...the sets can all be the same or you can mix them up. Sew together. I sew a top square to a bottom, press the seam up. Next row, press down, third row press up. That way the seams next nicely together.

Sew together one 2.5" background square, one 2.5" colored square and two HST's. Watch how you turn these HST's, you want the background side facing the background square.

Make the snowball block: Place one 3" square in each corner of the 6.5" square, rights sides together. Sew a diagonal line and cut 1/4" from that line. (Like my good friend Pat, I don't like having to draw the diagonal lines, so I cut the corners off first, then sew.) Press open.

Sew a 4-square patch to either side of two 6-square patches, making sure the background square is on the outer top edge, not touching the 6-square patch. Sew a 6-square patch to either side of the snowball block.

Now sew all three rows together. Put a 14.5" background strip on the top and bottom. Add the remaining 2 strips on either side. Sandwhich with batting and backing, quilt and bind it. Embellish anyway you want.
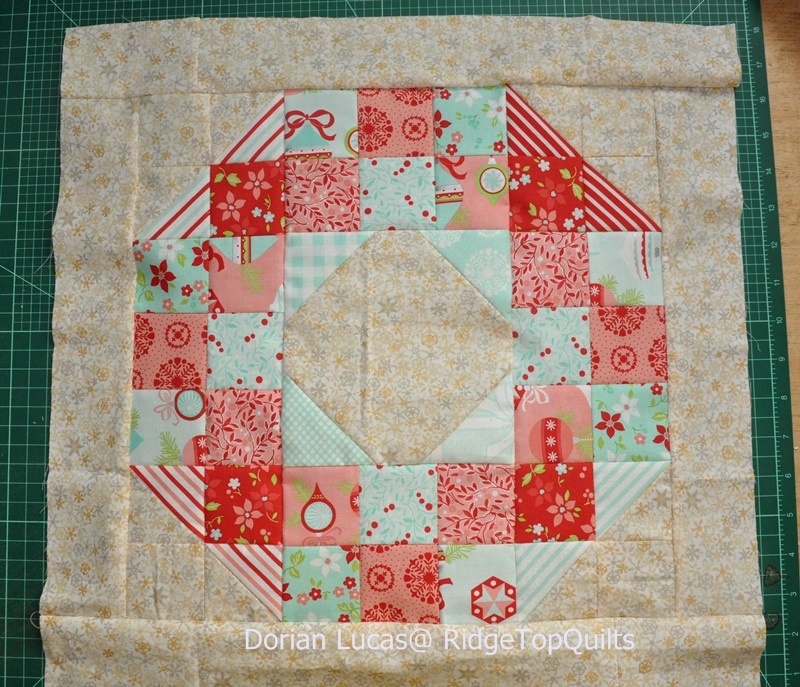
Wouldn't these look cute with some seasonal buttons sewn around the wreath? Happy Holiday making!
Thursday, November 14th
Cynthia's Creating Ark
Songbird Designs
Farm Quilter
Kathy's Kwilts and More
Bumbleberry Stitches
Quilt Schmilt
Songbird Designs
Farm Quilter
Kathy's Kwilts and More
Bumbleberry Stitches
Quilt Schmilt
Have a great day!


 Posts
Posts


