Hello Folks,
Sorry for the absense. I haven't been doing too very much. This is our hottest part of the year, and it's been dragging me down. Along with a few other things ;)
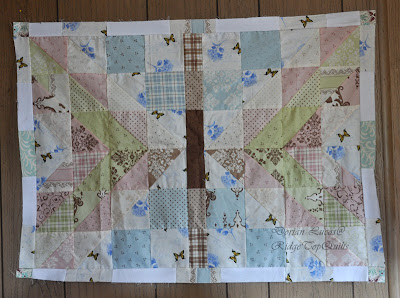
I did get the baby top finished. So will be starting to quilt that this week.
I've also been getting a special post written, with a new pattern. Using 4 patches, 9 patches, and HST's in these colors.
So be looking for that post in the next week.
Have a great day all.
Hope you're enjoying the fabulous posts and giveaways over on stash manicure.
PS, don't forget to drop me a comment and leave me your name, if you're a wantobe quilter! LOTS of prizes you could win over at the Stash, come August.
Tuesday, August 30, 2011
Saturday, August 20, 2011
Happy weekend!
Hey ya'all, hope you're having a great day. My day yesterday was nice and smooth.
I worked on a baby quilt for my BF's first grandchild. Not sure if she wants to see the quilt before it's done or not, so wont post pics just yet.
Also went to town to do some errands. One of them being to renew my drivers license. And it went SO SMOOTHLY! I was a happy camper. Had to take an 18 question test, and only missed one. Pretty good. LOL
Here is my sisters finished Lone star. She used some lovely batiks.
Isn't that pretty? My sister has been sewing clothes most her life, and has only ventured into quilting a tiny bit. It's fun to share quilting stuff with her now. Thanks Sis!
Anyone else have a lone star they want to share? I would love to see it.
Have a great weekend!
PS, don't forget to drop me a comment and leave me your name/email, if you're a wantobe quilter! Or even if you are a quilter who wants to win a gorgeous prize! LOTS of prizes you could win over at the Stash!
Tuesday, August 16, 2011
Putting it together
Hello everyone,
I am not sure if anyone has followed me all the way thru with my little quilt along. But just in case, here is the final installment. I do hope, that if you've made my star quilt along, that you email me pictures or drop me a comment with a link to your blog so I can see it.
So, your medallion should be at 28". Your long sides at 8 1/4" x 28" and your corner squares should be 8 1/4" square.
First, sew a corner square to both sides of two long pieces.
Next, put your two side pieces on the medallion. Pinning at the top and bottom, then all along the side. Fudging it in a little if measurments are a smidge off.
Now add your top and bottom pieces. Pinning where the seams come together and a few more to keep it all stable.
Here is mine. I took the pictures at the wrong time of day, too much bright sun, even in the shade....
It's hard to see the buttery, beautiful yellow here...I just love it though. So cheerful.
I'll see about taking a picture at a different time of day, or even in the house, so you can see the colors better.
PS, don't forget to drop me a comment and leave me your name, if you're a wantobe quilter! LOTS of prizes you could win over at the Stash, come August.
Tuesday, August 9, 2011
Lone Star quilt along part 3
Hello Folks,
How are you all doing? Has anyone completed step 2? I would love to see!
For anyone interested, here is Part 3.
Fabric A: 2 strips cut at 15 1/2"
Fabric B: 1 strip cut at 15"
Fabric C: 1 strip cut at 15 1/2"
From fabric A. Cut your strips at 9 1/2" intervals, so you have 9 1/2" x 15 1/2" rectangles.
From fabric B, Cut your strip at 9" intervals, so you have 9" x 15" rectangles
From fabric C, Cut your strip at 9" intervals, so you have 9" x 15 1/2" rectangles.
Take your rectangles, two at a time. Fold in half lengthwise, and just finger press along the two edges.
Open up and fold in half width wise, and finger press in the same manner. So when you open them up, you'll have little creases like this.
Lay your ruler from one crease to the other, and cut along the ruler edge.
Go all the way around your rectangles, cutting off the corners. Do this with all of your rectangles.
Take your fabric A rectangles (Note here: I messed up my cutting on ALL of my green rectangles, so am having to switch to blue. So my blue is now my fabric A.) And cut them all in half lengthwise.
Cut your fabric C rectangles widthwise.
Lay your blocks out like this.
The numbers are the order we'll be piecing this together. So starting with 1 and 2, rights sides together. Make sure that diamond piece sticks 1/4" past the edge of fabric A, at the arrow. And sew your seam. Chain piece these, so do all your four piece 1's and 2's.
Open it up and place piece 3 along the next side like this. Watch the arrow, that's where the 1/4" hang over piece needs to be. (chain piece them all)
Open it up, and it should look like this. Making sure the diamond stuck over 1/4", made it so the two fabrics line up perfectly together at the arrows.
Now you want to sew your pieces 4 and 5 together, BEFORE adding them to the first unit.
Right sides together, the arrow is your 1/4" hang off spot.
Do all four piece 4s and 5's. Now do pieces 6 and 7 in the same way. Arrow is your 1/4" mark.
You should now have 4 unit's going one way and 4 unit's going the other. The arrows show you the pieces aligned just right.
Take your first unit, put right sides together with your unit 4/5 pieces. When you pin this seam, the two seams from the two different units will cross. You want the intersection of those two seams to be at the 1/4" seam allowance, where you are going to sew.
Put your unit with the 6/7 pieces on the next side. Making sure your seams cross at the 1/4" like the first unit. Open it up.
Your unit's should measure 28" x 8 1/4".
Let me know if you have any questions or problems!
~~~~~~~~~~~~~
Have you seen what Samm is giving away this week!! She gave away a brand new Janome sewing machine yesterday!! WOW!
It's not too late to give me your name and info, and get in on the fun!
Saturday, August 6, 2011
Saturday stuff.
Hello everyone, I hope you are enjoying your Summer.
Is there anyone who has done step 2 of the quilt along? Please feel free to pass along your pictures or post them to the Flikr group. Haven't shown us your stars yet? Post that too, we would love to see.
You still have time to sign up with a sponser for the Wantobe quilters campaign!
Just follow me and Stash Manicure, give me your name, email address and phone number (these go right to Samm and NO WHERE else!).
Just remember, we have to get a hold of you if you win. So don't be a No-Reply commenter!
And I heard it from a little bird, that NEXT week during the campaign, the prizes are going to be even MORE awesome than last week!! So hurry and sign up with a sponser!
Karen has a great post on how to check if you are a no-reply blogger. She talks about setting up a blog, JUST for a profile, so that those blogs you comment on, can get back to you. So go read this post! I would hate for you to win something on Stash Manicure's campaign, and not be able to receive it.
~~~~~~~~~~~~~~~~
We are going shopping today. One of the things I will be buying is some BATTING. I am finally going to start working on my pile of quilt tops that need quilting.
One of the first ones I am going to do is a quilt that was made with this pattern, but in different colors.
It's a baby quilt for one of our friends on the Q&N. But for my house...that's going to be a hard choice!
Do I quilt the latest mystery quilt first? (this is a sneak peek...just one block)
If you want to see the rest....you'll have to buy the pattern ;) HERE.
Or should I quilt my cute little butterfly?
It's small, so maybe that would be best to start with?? Of course, I have my two star wall hangings, or 20 other large quilt tops to choose from!!
Wish me luck....
Have a great day!
PS, don't forget to drop me a comment and leave me your name, if you're a wantobe quilter! LOTS of prizes you could win over at the Stash, come August.
Monday, August 1, 2011
Lone star quilt along part 2
Linking up with H&M today! Thanks Gals.
So how's it going? Does anyone else have a finished star?
Today's block are the corner blocks. A cute little pinwheel.
You will need:
Two strips of Fabric A -- 2 7/8"x at least 35" (can be WOF)
One strip of Fabric C -- 2 7/8" x at least 35" (can be WOF)
One strip of Fabric D -- 2 7/8" x at least 35" (can be WOF )
One strip of Fabric D ---2.5" x WOF
Lay one fabric A and fabric C strips right sides together. Make a pencil mark every 2 7/8", so that you have eight - 2 7/8" squares all down the fabric.
Next mark diagonal lines in a zig-zag fashion, thru the corner of each block.
Sew a 1/4" seam on both sides of the diagonal lines. And cut apart on the solid lines.
Now you should have 16 HST (half-square triangle) blocks.
Do the same thing with your second fabric A strip and your fabric D 2 7/8" strip.
You should have 16 HST blocks.
Now TRIM them all to 2.5" blocks.
Do you see how the seam line goes exactly from one corner to the next? That's how your blocks should look. If the seam line is off, then when you put your blocks together, the pinwheels will not look right.
Does it really matter if you trim this from your blocks?
YES, it is!! It's a pain, I know. But it will make your blocks come together SO much easier, and look SO much better....take it from me!! LOL
Cut your fabric D, 2.5" strips into thirty-two - 2.5" squares.
Lay your pieces out in this order. Making sure you have your HST blocks turned right!
Start sewing them together. I like to chain stitch. I sew them all up in pairs....keeping the four lines seperate.
See this 1/4" space between the point of the triangle and the edge?
Thats important! If your triangle went all the way to the edge, then your points would be cut off when you sewed them to the next row.
Then I sew the pairs together....
And then the rows.....
Now see my points are almost perfect.
This will make all four of your corner blocks. The strip piecing method is much quicker and easier, in MY opinion, then cutting squares individually to make your HST's. But you do it however you are comfortable.
And don't forget, to show us your progress!!
PS, don't forget to drop me a comment and leave me your name, if you're a wantobe quilter! LOTS of prizes you could win over at the Stash, come August.
So how's it going? Does anyone else have a finished star?
Today's block are the corner blocks. A cute little pinwheel.
Two strips of Fabric A -- 2 7/8"x at least 35" (can be WOF)
One strip of Fabric C -- 2 7/8" x at least 35" (can be WOF)
One strip of Fabric D -- 2 7/8" x at least 35" (can be WOF )
One strip of Fabric D ---2.5" x WOF
Lay one fabric A and fabric C strips right sides together. Make a pencil mark every 2 7/8", so that you have eight - 2 7/8" squares all down the fabric.
Next mark diagonal lines in a zig-zag fashion, thru the corner of each block.
Sew a 1/4" seam on both sides of the diagonal lines. And cut apart on the solid lines.
Now you should have 16 HST (half-square triangle) blocks.
Do the same thing with your second fabric A strip and your fabric D 2 7/8" strip.
You should have 16 HST blocks.
Now TRIM them all to 2.5" blocks.
Do you see how the seam line goes exactly from one corner to the next? That's how your blocks should look. If the seam line is off, then when you put your blocks together, the pinwheels will not look right.
Does it really matter if you trim this from your blocks?
YES, it is!! It's a pain, I know. But it will make your blocks come together SO much easier, and look SO much better....take it from me!! LOL
Cut your fabric D, 2.5" strips into thirty-two - 2.5" squares.
Lay your pieces out in this order. Making sure you have your HST blocks turned right!
Start sewing them together. I like to chain stitch. I sew them all up in pairs....keeping the four lines seperate.
See this 1/4" space between the point of the triangle and the edge?
Thats important! If your triangle went all the way to the edge, then your points would be cut off when you sewed them to the next row.
Then I sew the pairs together....
And then the rows.....
This will make all four of your corner blocks. The strip piecing method is much quicker and easier, in MY opinion, then cutting squares individually to make your HST's. But you do it however you are comfortable.
And don't forget, to show us your progress!!
PS, don't forget to drop me a comment and leave me your name, if you're a wantobe quilter! LOTS of prizes you could win over at the Stash, come August.
Subscribe to:
Posts (Atom)